Using the RAD-seq Pipeline
If you’re using the mozzie or rescue server and want to use Stacks >= 2.0
to perform your RAD-seq data processing and analysis, then you have the
option of using the RAD-seq pipeline:
radpipe.
To use the pipeline, it is highly recommended you have some knowledge on how to use Screen or another terminal multiplexer such as Tmux. This is because the pipeline can run for hours or days and a terminal multiplexer will allow you to detach the session so it can continue running when you disconnect from the server. These instructions assume you are familiar with Screen.
If you want to run radpipe on another system such as your own virtual machine
or local computer, you’ll need to install it and the dependencies described
here.
Note that radpipe does not support the Stacks de-novo assembly workflow (yet). To use the pipeline, you will need a reference genome to align your sequence data to.
Project setup
Before you begin any analysis you need to create your project directory to store your analysis.
Your project directory should follow our best practices guidelines.
For example:
# I like to store my projects in a directory named 'projects' located in my home directory
cd ~/projects

# Give your project a name that makes sense
mkdir super_rad_project && cd super_rad_project

# Create directories for the data, results, and reference files
mkdir data results reference
If you don’t have your reference genome for your organism on the server yet,
download it to the reference/ directory. If the reference genome is already
on the server, I recommend you move or or symlink the file to the reference
directory.
Download your sequencing FASTQ files and place them in your data/
directory. Make sure your data/ directory has a separate directory for
each sequencing run or library. Each directory must contain two files from
Illumina sequencing, a FASTQ file containing forward reads (R1) and a FASTQ
file containing reverse reads (R2).
Each library should have a barcodes file containing the barcode pair and the sample name separated by tabs. For example:
ACGTCA	CATGAC	A110
GTACTG	CATGAC	E002
CTAGTC	CATGAC	X433
AGCTGA	CATGAC	A8814
If using the mozzie or rescue servers and symlinking data make sure your paths
begin with /mnt/galaxy/home/my_username/... and not /home/my_username/....
This is because jobs running on worker nodes need the /mnt/ path to find the
files as the user directory symlinks in /home/ don’t exist on the worker
nodes.
Pipeline stages
The pipeline is composed of a number of stages.
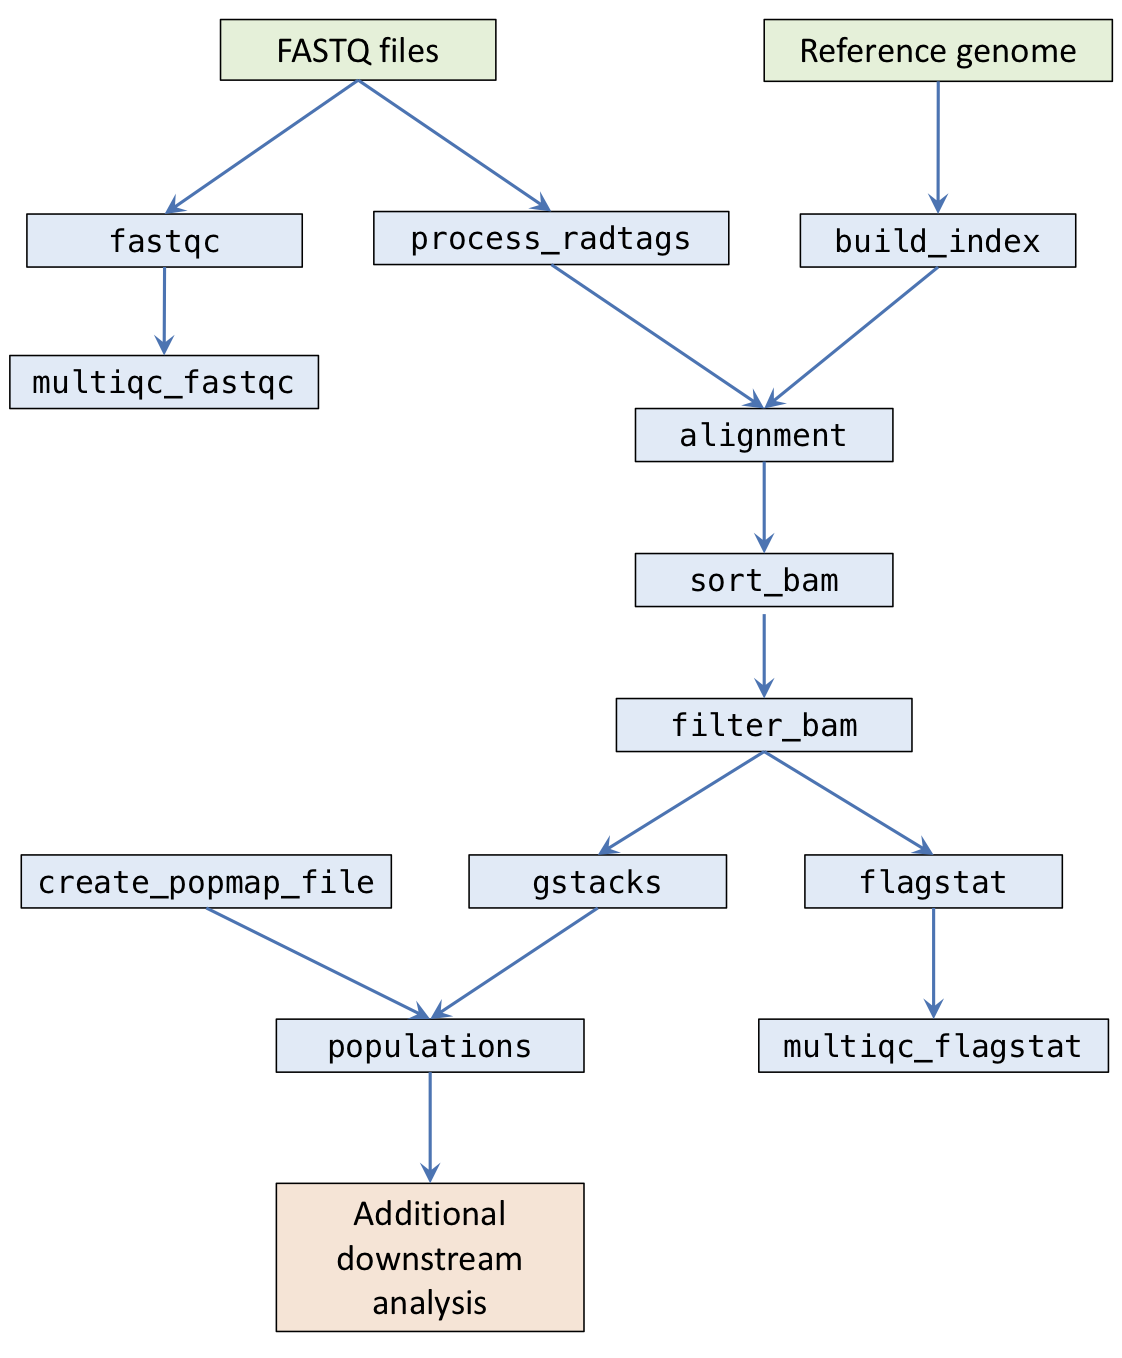
fastqc: Runs FastQC on raw sequencing files and outputs toresults/qc/fastqc/.multiqc_fastqc: Runs MultiQC on FastQC outputs and outputs toresults/qc/.process_radtags: Runs Stacks process_radtags to demux samples and outputs toresults/sample_radtags/.build_index: Builds index for the reference FASTA file for either bwa or bowtie and stores indices inresults/ref/.alignment: Aligns FASTQ files with either bwa or bowtie and outputs BAMs toresults/alignments/.sort_bam: Sorts BAM files by coordinate and generates indices. Outputs toresults/alignments/.filter_bam: Optional step to filter BAM files using Samtools view. Outputs toresults/alignments/.flagstat: Runs Samtools flagstat on the final BAM files and outputs toresults/qc/flagstat/.multiqc_flagstat: Runs MultiQC on the flagstat outputs and outputs toresults/qc/.gstacks: Runs Stacks gstacks on sorted BAMs and outputs toresults/gstacks/.populations: Runs Stacks populations and outputs toresults/populations/.
Ruffus (the framework the pipeline uses) works by requiring you to specify a target task. The pipeline will then work out which tasks the target task depends on, and run them automatically.
Create a pipeline config file
radpipe reads a configuration file to define how the pipeline stages will
be run. This config file is written in YAML.
Copy the below block, and paste the contents in a file named pipeline.config
in your project directory.
#---------------------------------
# CONFIG
#---------------------------------

pipeline_id: radpipe

# The directory the pipeline will write files.
results_dir: results/

# The reference genome in FASTA format.
reference_genome: ref/mppdraft3.fa

# Sequencing data
# Each sequencing run / library should be in its own directory. In each
# directory, there should be two Illumina sequncing read files in *fastq.gz
# format (R1 and R2) and a text file containing barcodes in the format that
# process_radtags accepts. FASTQ filenames should be unique.
# Note that the directory name will be used as the read group ID for when
# performing alignment.
libraries:
    lib_01:
        lib_dir: data/lib_01
        r1: BparvusLib1_S1_R1_001.fastq.gz
        r2: BparvusLib1_S1_R2_001.fastq.gz
        barcodes: lib1_barcode.txt
    lib_02:
        lib_dir: data/lib_02
        r1: BparvusLib2_S2_R1_001.fastq.gz
        r2: BparvusLib2_S2_R2_001.fastq.gz
        barcodes: lib2_barcode.txt

#---------------------------------
# PROCESS RADTAG OPTIONS
#---------------------------------

# The two restriction enzymes used.
renz_1: sphI
renz_2: mluCI

# Additional process_radtag options
# http://catchenlab.life.illinois.edu/stacks/comp/process_radtags.php
# Add PCR adapter options if necessary:
# --adapter_1 AGATCGGAAGAGCGGTTCAGCAGGAATGCCGAGACCGATCTCGTATGCCGTCTTCTGCTTG
# --adapter_2 AGATCGGAAGAGCGTCGTGTAGGGAAAGAGTGTAGATCTCGGTGGTCGCCGTATCATT
process_radtags_options: "-t 60 -c -q -r -s 10"

#---------------------------------
# ALIGNMENT OPTIONS
#---------------------------------

# Which program to use for alignment. Choose from [bowtie, bwa mem]
alignment_method: bwa mem

# Additional alignment options
# bwa mem: http://bio-bwa.sourceforge.net/bwa.shtml
alignment_options: "-a"
# bowtie: http://bowtie-bio.sourceforge.net/manual.shtml
# alignment_options: "-v 3 --tryhard --best"

#---------------------------------
# BAM FILTERING OPTIONS
#---------------------------------

# Samtools view filtering options. Comment out to skip bam filtering step.
# samtools_view_options: "-f 3 -q 30"

#---------------------------------
# STACKS GSTACKS OPTIONS
#---------------------------------

# Extra options for gstacks
# http://catchenlab.life.illinois.edu/stacks/comp/gstacks.php
gstacks_options: ""

#---------------------------------
# STACKS POPULATIONS OPTIONS
#---------------------------------

# Analysis ID
# If you plan to run multiple populations runs with different popmap files, give
# each run a different name, which will create new directories in the results
# directory instead of overwriting them
analysis_id: analysis_v1

# Custom popmap file (optional)
# If this is left blank, the pipeline will create a popmap file with all samples
# in the same population group. Note that this is for stacks populations
# only (gstacks will use all available samples)
# popmap_file: test_popmap.txt

# Values of r for which Stacks populations will run. A new directory will
# be created for each run
populations_r:
  - 0.5
  - 0.75
  - 0.8

# Extra options for populations. Note that the --vcf option will be
# automatically included when running the pipeline.
# http://catchenlab.life.illinois.edu/stacks/comp/populations.php
populations_options: "--min_maf 0.05 --write_random_snp --hwe --fstats --genepop"


#---------------------------------
# SLURM PIPELINE CONFIG
#---------------------------------

# Default settings for the pipeline stages.
# These can be overridden in the stage settings below.

defaults:
    # Number of CPU cores to use for the task
    cores: 1
    # Maximum memory in gigabytes for a cluster job
    mem: 4
    # VLSCI account for quota
    account: VR0002
    queue: main
    # Maximum allowed running time on the cluster in Hours:Minutes
    walltime: '1:00'
    # Load modules for running a command on the cluster.
    modules:
    # Run on the local machine (where the pipeline is run)
    # instead of on the cluster. False means run on the cluster.
    local: False

# Stage-specific settings. These override the defaults above.

stages:
    fastqc:
        walltime: '2:00'
    multiqc:
        walltime: '1:00'
    process_radtags:
        walltime: '8:00'
        mem: 4
    build_index:
        walltime: '8:00'
        mem: 16
    alignment:
        walltime: '8:00'
        cores: 2
        mem: 8
    sort_bam:
        walltime: '4:00'
        mem: 4
    filter_bam:
        walltime: '1:00'
    flagstat:
        walltime: '1:00'
    gstacks:
        walltime: '24:00'
        cores: 8
        mem: 32
    populations:
        walltime: '24:00'
        cores: 4
        mem: 8
Carefully read through the config file and edit the options to fit with your analysis.
- Edit the
librariesdictionary to contain your library directories and filenames. - Edit the Stacks process radtags options if necessary.
- Edit the alignment options if necessary. Note that the pipeline supports
both BWA mem and Bowtie using the
alignment_methodoption. - Edit the BAM filtering options if necessary. If
samtools_view_optionsis commented out, filtering will be skipped. - Edit the Stacks populations options if necessary. If you have a popmap file,
uncomment the
popmap_fileoption and provide the path to your file. - The remaining SLURM pipeline options should be left as is unless your jobs are running out of walltime or memory.
Executing the pipeline
If you’re using the mozzie or rescue servers, radpipe is already installed.
Before you begin, start up a screen session. For example:
# Create and attach a screen session named 'pipeline'
screen -S pipeline
radpipe is installed inside a Python virtual environment. You can activate the virtual environment with:
source /mnt/galaxy/gvl/software/radpipe/bin/activate
What is a virtual environment?
On the server, radpipe is installed inside a Python virtual environment.
TODO: briefly explain virtual environments
First, see if you can run radpipe and look at the usage information the
program has with the -h option.
radpipe -h
The pipeline runs by specifying a target task. All stages that are required
for that task to run are executed. For example, running radpipe with
--target_task=alignment, the pipeline will run the process_radtags,
build_index, and alignment steps. If you want to know which tasks will
be run when you specify a particular target_task, you can refer to the
above flowchart, then look for your task and follow
all the dependencies upward to see what will be run.
Try using the -n (or --just_print) option to perform a dry run of the
pipeline.
radpipe \
    --config pipeline.config \
    --verbose \
    --target_tasks alignment \
    -n
Something like the following should be printed on to the screen:
________________________________________
Tasks which will be run:

Task = 'radpipe::reference_genome'
Task = 'radpipe::process_radtags'
Task = 'radpipe::bwa_index'
Task = 'radpipe::bwa_mem'
________________________________________
Note that since “bwa mem” is specified as the alignment method in the configuration file, the build_index task is named bwa_index and the alignment task is named bwa_mem.
I recommend always running radpipe with the -n option to print what tasks
will be run before running jobs for real.
Verbosity level:
The --verbose option allows you to set the verbosity (how much information
the program prints out to the screen) of the pipeline. It’s useful to increase
the verbosity level if you’re troubleshooting a problem. Generally, I recommend
--verbose 3 as a good level of verbosity for radpipe.
You can also generate a flowchart image with the --flowchart option.
radpipe \
    --config pipeline.config \
    --target_tasks populations,multiqc_fastqc,multiqc_flagstat \
    --flowchart_format png \
    --flowchart radpipe.png
Running the pipeline
It is recommended to run fastqc and multiqc_fastqc before you begin
processing your data. After MultiQC finishes, view the multiqc_report.html
file by transferring the html file to your computer and opening it in your
web browser. Alternatively you could also move the html file to the your
public_html directory and view the file remotely.
Make sure you’re inside a screen session before running the pipeline.
You can run the pipeline to multiqc_fastqc with the following:
radpipe \
    --config pipeline.config \
    --verbose 3 \
    --log_file radpipe.log \
    --target_tasks multiqc_fastqc \
    --jobs 8 \
    --use_threads
The --jobs option allows the pipeline to submit multiple jobs to the
SLURM queue. This will result in a maximum of 8 jobs in your queue.
If there are more than 8 jobs in total, the jobs will be submitted one
at a time as jobs get completed.
How many jobs should I run at a time?
If you’re the only person running jobs on the server, you can use as many
CPUs as there are available. SLURM will handle the resources automatically,
so jobs will wait in the queue until there are enough resouces available for
that particular job to run. However, if you’re sharing the server with other
people, please limit the number of jobs you’re submittiing as the SLURM
scheduling configuration is set to run jobs as First In, First Out.
Once your jobs are running, in another terminal session or screen session, try checking the SLURM queue (and if you need to refresh your memory on SLURM commands, you can do so here).
squeue
You should see a list of your jobs running and which node they’re running on. e.g.
     JOBID PARTITION     NAME     USER ST       TIME  NODES NODELIST(REASON)
     1843      main radpipe_     jess  R       3:30      1 master
     1844      main radpipe_     jess  R       2:39      1 w1
The job names in the queue are too long, so they appear cut off. You can
use squeue’s -o option to specify the output format and make the job
name column wider.
squeue -o "%.10i %.22j %.8u %.8T %.10M %.9l %.6D %R"
Using the --log_file option will create a log file called radpipe.log
which will keep track of what commands you ran.
As an addition layer of logging, Slurm job scripts are written in the newly
created jobscripts/ directory. If a job fails, and you’re trying to
troubleshoot why, you can check the stderr files in this directory.
You can also increase the verbosity by supplying a number after the --verbose
option, e.g. --verbose 3.
If an individual task of the pipeline fails (e.g. due to running out of memory), the pipeline will stop running after the jobs in the SLURM queue are finished. When you run radpipe again, the pipeline will only run the jobs that need running (i.e. it won’t re-run the previously completed steps). However, if you update an earlier stage in the pipeline (e.g. changing the reference genome file), all the downstream tasks will be indentified as being out-of-date, and the pipeline will attempt to run these tasks again the next time you specify a target task that depends on the out-of-date task.
How to kill a running pipeline
If you want to kill a running pipeline that is running on the cluster and
^C isn’t killing the pipeline process, you will need to cancel all individual
pipeline jobs in the system. With SLURM, you can cancel your jobs with
scancel <job_id>. If all your jobs are from radpipe, you can cancel all jobs
submitted with scancel --user=<your_username>.